Shrimp Wonton Soup This is a family favorite in my house. My family loves it because of how the shrimp and noodles are paired with this light clear flavorful broth. I like it because it may seem like a lot of work, but it is a great simple recipe. When I have the time I make the wontons from scratch but on rare occasions, I buy the wontons frozen. We love to pair this wonton soup with limes and sriracha sauce. Although, it might not be traditional, we love the slight variation of it. Note, in case you cannot have a wine in your soup, substitute it by adding 1 Tbsp of soy sauce to your broth. It will also work very well in a pinch. Of course, you are always free to make it your own to enjoy.  Shrimp Wonton Soup
Yields: 6 servings Ingredients:
Directions:
0 Comments
Balsamic Watermelon Feta Salad My Balsamic Watermelon Feta Salad is a very simple summer salad I like to make for my family and friends. It is perfect to bring to barbecues or simple get-togethers because it is such a great side dish which goes well with any meat or vegetables. Additionally, this is a great salad to impress the other guests. I love to use feta cheese in this salad because the salt and creamy texture of the feta cheese just seems to be the perfect pairing with the sweet watermelon. Feel free to choose your own favorite type of cheese but feta is my personal favorite. For example, friends of mine make this kind of salad with goat cheese, and I must say, it tastes absolutely wonderful. Another favorite addition to my salad is mint. I just love the taste of mint paired with the watermelon. When I choose to make this type of salad without arugula and balsamic, I usually use plenty of mint. This gives the salad a fresh summer feel and taste. When I started to make the Balsamic Watermelon Feta Salad on the regular, I re-introduced the mint because I love the way my other salad tasted before. However, I noticed that not everyone agrees with this kind of taste. I heard for people which really like it, and others which cannot stand it. For this reason, I made the mint an optional ingredient. When I make this salad at home I like to make croutons out of a long piece of bread brushed with olive oil, and pressed in a panini press. I then serve my hot meat on top of this crouton which I place on the side of the salad. This gives the salad a great look as well as prevents the warm meat from wilting the arugula. However, this salad is great all on its own and can be served by itself as well. Secret tip: If you have balsamic reduction left from making your salad, it goes well with vanilla ice cream, strawberries, or raspberries. My family always waits for the leftover sauce after I make this type of salad. 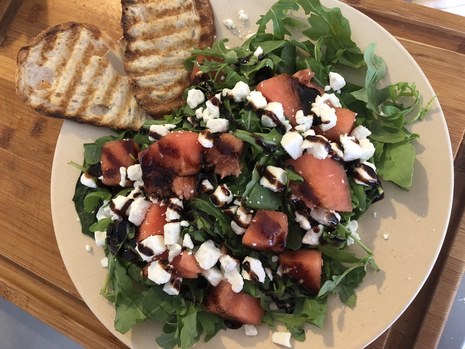 ,Balsamic Watermelon Feta Salad
Yields: 8 servings Balsamic Reduction: Balsamic vinegar 1/2 cup Brown sugar 1/4 cup Salad: Baby arugula 5 oz. 1 package Seedless watermelon 8 cups, cubed Feta cheese 7 oz. 1 package, crumbled mint(optional) 1/4 cup, chopped crushed pepper to taste Balsamic Reduction: To make the balsamic reduction, place the balsamic vinegar and brown sugar in a saucepan, and bring the mixture to a boil. Reduce the heat until it simmers and let it simmer for 6-8 minutes. Once it has reduced, remove it from the heat and let it cool. Salad: Arrange arugula over a plate or large platter. Scatter watermelon, feta, and mint over the arugula. Drizzle with balsamic reduction and sprinkle with pepper. Enjoy! Avocado Chocolate Frosting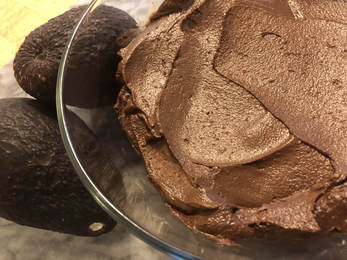 Previously, when posting about my Chocolate Zucchini Bread, I had mentioned that it was a great pairing with my Avocado Chocolate Frosting. Recently, a friend made a request to have a cake made for her with Avocado Chocolate Frosting. She really loved my muffins with it and asked me to try my frosting with a cake. When I made the cake for her, I added my Avocado Chocolate Frosting and topped it with candied hemp seeds, roasted cocoa nibs and chocolate pieces. Fair Warning: This is a very rich chocolate cake and chocolate frosting - yummy! On a plus side, I made sure to make the cake and frosting not too sweet buy only using a semi-sweet chocolate. I am suggesting that you give it a try for yourself and sweeten up the cake and frosting to your liking. Secret tip: If I like the frosting to be rather sweet, I add a few dates and blend them in the food processor. This will give it a natural sweetness as well as keeping the frosting smooth in texture. Additionally, in my recipe, I added oil as an optional ingredient because I like my frosting to be a bit stiff. This has an added benefit of using it to do more decorative things on my cake. It is also possible to add the oil if you feel that your frosting is not smooth enough. Furthermore, adding oil can aid in the process of avocados and cocoa powder combining. If you do choose to use oil, choose a neutral flavored oil such as olive oil, as it will not affect the flavor of the frosting. However, if you are fine with the normal consistency of the frosting, feel free to simply skip the oil. 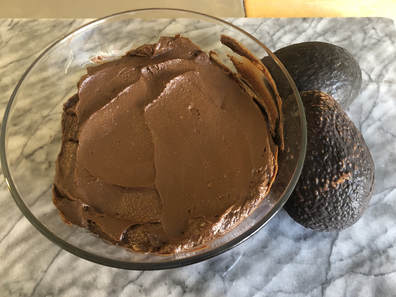 Chocolate Avocado Frosting Yields: 1 Cup Ingredients: Avocadoes 2, ripe Cocoa powder 1/2 cup Maple syrup or your choice of sweetener 1/3 -1/2 cup Vanilla extract 1/2 teaspoon Sea salt 1/8 teaspoon Oil (optional) 2 Tablespoons Directions: Place the avocado meat and the rest of the ingredients in a food processor. Combine the ingredients until smooth. Add oil if your processor needs more help combining the ingredients. Best if used immediately, but can be refrigerated for a few days. Look and texture will change over time. Enjoy! Chocolate Zucchini Bread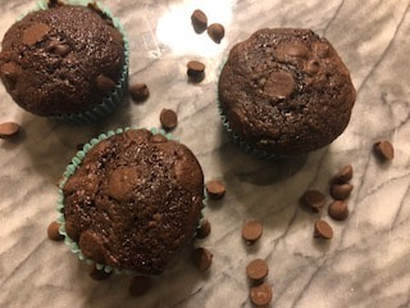 The zucchini bread was a request from a long time friend of mine. She is one of the lucky ones to have a garden full of zucchini. I am so jealous. This is also the recipe I have used for my son's Woodland themed birthday party which was at a local park called Sulfur Creek. If you have not been there, I highly recommend a visit. We had the party outside, right next to the fox enclosure which was perfect because of the theme I had for the party. The birthday package also included a show with three animals that the kids could pet and learn about. The final event was arts and crafts for children of all ages. Sulfur Creek is a nonprofits animal rescue which is financed through donations, people which rent this place for parties, and supported by volunteers. For my sons party to keep the theme as natural as possible, I decided to make muffins instead of frosted cupcakes which gave the party a more earthy look. Because my son really likes chocolate, I made zucchini bread. Additionally, zucchini bread was a bit more healthy then frosted cupcakes. The reason I love this recipe is because it is a great chocolate cake, moist, and very, very chocolaty. I usually add more zucchini then the recipe calls for but this is my personal preference. I love that this type of cake is dense, but still moist and soft. Sometimes, I make cake with zucchini and pair it with a avocado fudge frosting. I will include that recipe another time. 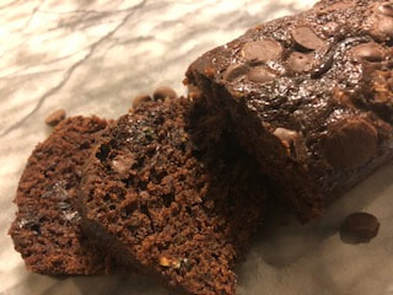 Chocolate Zucchini Bread
Yields: 20 standerd muffins or 2 loaves (8x4 inches) Ingredients: All-purpose flour 2 cups Cocoa powder 1 cup Salt 1/2 teaspoon Baking soda 2 teaspoon Allspice 1 teaspoon Grounded cinnamon 1 1/2 teaspoon Brown sugar 1 1/2 cup Melted butter 1/4 cup Vegetable oil 3/4 cup Eggs 3 Buttermilk 1/2 cup Grated zucchini 2 cups about 3 medium size (wash and dry the zucchini, no need to peel the skin off) Semi-sweet chocolate chips 1 cup Directions:
LEMON BARS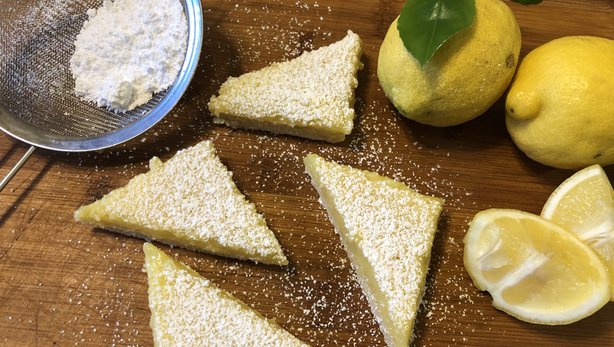 It is summer time here in the Bay Area, and every summer my neighbor has an abundance of lemons on her lemon tree. This is the time when I get a full bag of lemons every week. To show her my appreciation, I made lemon bars for her and her whole family. In fact, I made so many lemon bars that I decided to share them with my surrounding neighbors. Everyone who tried them loved them and kept asking for the recipe. That was when I decided to share my recipe. I simple love the recipe because its easy, quick and delicious. I adapted this recipe from a formula I learned while i was in culinary school. When I make this recipe at home, I have a juicer and I juice the lemons whole. This gives my lemon bars a more tart taste because of the lemon skin. I added the 2 additional tablespoons to the recipe for those of you who will just use lemon juice. Using lemon zest gives the bars the same flavor as if you had juiced them whole in a juicer. If you don't like your bars to taste too tart, you might omit the zest all together. When you look at my recipe you may have noticed that egg wash is optional. I placed egg wash as optional because I have done my bars both with egg wash and without egg wash, and find that both works for me. Through experience, I add that layer of egg wash to ensure that the lemon filling does not get absorbed by the crust during the baking process. This step is optional. I hope you will enjoy these bars as much as my neighbor, my friends, and family do. Personally, I prefer the lemon bars the next day. For me, they seem to just taste better that next day. 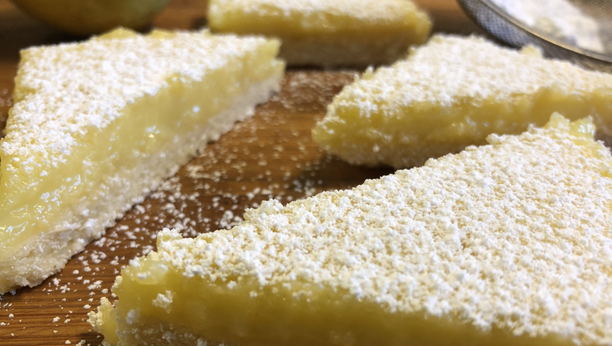 Lemon Bars
Yield: 24 bars Sweet Tart Dough Butter 1/2 cup Powered sugar 1 cup Egg yolk 2 Egg 1 All purpose flour 2 cups Egg wash as needed (optional) Lemon Filling Sugar 1 1/2 cup Egg 4 All purpose flour 1/4 cup Lemon juice 2/3 cup Lemon zest 2 Tablespoons Milk 1/3 cup Salt 1/4 teaspoon Powdered sugar as needed Directions
Storage
|
AuthorWrite something about yourself. No need to be fancy, just an overview. Archives
June 2019
Categories |
 RSS Feed